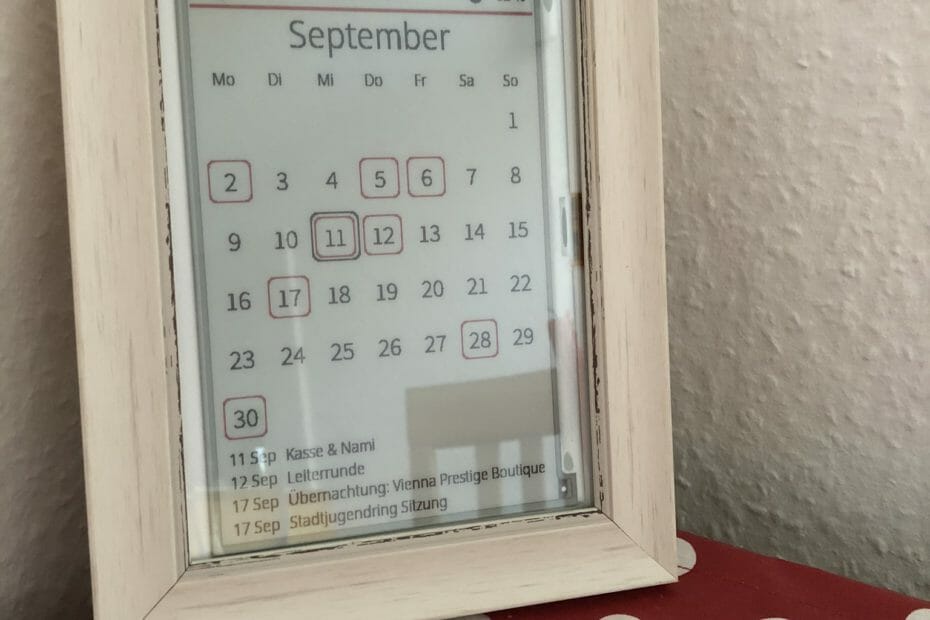
The use case is quite simple: You have multiple calendars for private and business events, but you don’t want to check it all the time online. Of course the weather information and the news would also be nice to be shown.
In short: It’s perfect for staying organised and keeping track of important details without having to check them up online each time.
What you’ll need:
- Raspberry Pi Zero WH ~ 16,49 €
- microSD ~ 4,69 €
- Power supply ~ 5,95 €
- Picture frame ~ 3,50 €
- Waveshare 7.5 Inch E-Paper Display ~ 67,99
In total I payed 98,62 €
Set Up the Raspberry
I will set up my Raspberry Pi Zero WH with a Windows Computer
- Download a Raspbian with desktop Image
- Burn the image via Etcher
- Create a file called SSH in the boot directory of the SC card
- Add your wifi credentials also in the boot directory called wpa_supplicant.conf
country=DE
ctrl_interface=DIR=/var/run/wpa_supplicant GROUP=netdev
update_config=1

network={
    ssid="NETWORK-NAME"
    psk="NETWORK-PASSWORD"
}
5. Eject the SD card from your computer and put it into the Raspberry Pi.
6. Start your Raspberry by connecting the power supply
7. Log in to your Raspberry via Putty
raspberrypi.local with Port 22
Default username: pi and password: raspberry
8. Change the hostname and password
sudo raspi-configE-Ink Calendar
There is a great GitHub project called Inky-Calendar
The installation is done in a few simple clicks:
Expanding the file system
sudo raspi-config --expand-rootfsEnable the SPI bus
sudo sed -i s/#dtparam=spi=on/dtparam=spi=on/ /boot/config.txtSet the local time
sudo dpkg-reconfigure tzdatareboot
sudo reboot nowInstall the actual package
bash -c "$(curl -sL https://raw.githubusercontent.com/aceisace/Inkycal/main/installer.sh)"
Enter no “2” to install the software
Use your own calendar, location and news
Simply download the Settings Generator from the project and open it in your browser.
The generated settings.json needs to be transferred to any directory. The location does not matter, however, you need to know the path to this file.
scp C:\Users\<name>\Downloads\settings.json mypi@pi:/home/pi/InkycalOr you can transfer it via SFTP using FileZilla
Update the calendar script – 25 march 2021
Automatically start of the script at a reboot is now part of the installation routine.
The update is very easy. Simply log in to your Raspberry via Putty and follow this three steps.
- Rename the old folder
mv Inky-Calendar Inky-Calendar-old2. Start the update script
bash -c "$(curl -sL https://raw.githubusercontent.com/aceisace/Inkycal/main/installer.sh)"
3. Check the settings.json
Test it and run it
Hi Eric Schuemann,
thank you for the awesome tutorial. The steps are clear and easy to follow. The housing of your calendar also looks good. Keep up the good work!
Hi Eric,
I’ve published a new release of the Inky-Calendar software. The URL for the installer is now:
https://raw.githubusercontent.com/aceisace/Inky-Calendar/master/Installer.sh
Just wanted to let you know so you can update it here 🙂
Hi,
Thank you for mentioning this. I had already seen it this morning and was happy. As soon as I have installed the update, I will also update the article.
Sure, you’re welcome 🙂
hello,
i´ve got a 7.8 inch e-ink display.
I have done all steps like in the discribtion – sadly calendar is not running =/.
Could the reason be that the e-ink display is to tall ?
Sorry, but Inkycal currently support the following E-Paper displays from waveshare:
* 7.5″ (all variants)
* 5.83″ (all variants)
* 4.2″ (all variants)
* 9.7″
Hallo,
ich habe diesen Artikel gefunden und versuche es nachzubauen. Leider scheinen die Pfadangaben nicht mehr zu stimmen. Kannst du den Artikel korrigieren?
Ich finde zB nicht den Speicherort für die settings.py.
Danke und Gruß
Olaf
Hallo Olaf,
vielen Dank für deinen Kommentar. Die Settings.py wurde durch eine settings.json ersetzt. Dazu gibt es auch einen neuen Settings-Generator. Die erzeugte Datei kann überall liegen, man muss nur den Pfad kennen. Ich habe es in dem Beitrag korrigiert.
Viele Grüße
Eric
Hallo, leider wird meine settings.json nicht in einem Ordner wie /home/pi/ gefunden, nur unter /boot wird sie gesucht.
Wie kann man das ändern?
Was muss im inkycal setup Generator bei “iCalendar filepaths, separated with a comma” eingetragen werden? /home/pi/Inkycal ?
Hallo Eric,
vielen Dank, habe es gefunden und auch ans Laufen gebracht. Ein Hinweis darauf, dass man auch mindestens ein Modul konfigurieren muss, wäre nicht schlecht. Wenn man so ganz neu einsteigt ist es ein wenig knapp, mit den Erklärungen, auch wo man den Pfad der Konfigdatei anpasst.
Aber wie gesagt, es läuft jetzt.
Ich habe allerdings jetzt ein anderes Problem. Das eInk Display zeigt beim Bildaufbau ales an, die Farbe schwarz verblasst dann aber mehr und mehr. Schwierig zu beschreiben 🙂
Ich habe ein 7,5″ Display mit schwarz, weiß und rot und einer Auflösung von 800 x 480.
Konfiguriert ist: “model”: “epd_7_in_5_v2_colour”
Kennst du den Effekt oder hast eine Idee woher es kommen kann? Wenn ich nur das Wetter mit 100% darstellen lasse, habe ich den Effekt nicht, nur beim Kalender als Liste oder Kalenderblatt.
Vielen Dank und Gruß
Olaf
Hallo Eric,
zur Info und für Andere, die evtl. das gleiche Problem haben.
Ich konnte es dadurch lösen, dass ich den HAT nicht über die Stiftleiste mit dem Pi verbunden habe, sondern die beiliegenden Kabel genutzt habe.
Danke für deinen Artikel, ohne den ich nicht auf dieses tolle Projekt gestoßen wäre.
Gruß
Olaf
Hallo Olaf,
ich vermute, dass ich ein ähnliches Problem habe. Ich habe alles verbunden und alle Schritte befolgt aber auf meinem Bildschirm tut sich leider nichts. Selbst, wenn ich das beiliegenden Kabel nutze tut sich nichts. Hast vielleicht noch einen Tipp für mich?
Grüße
Julien
(Meine Hardware: Raspbaerry Pi Zero W, 16 GB ssd SanDisk, 7.5 inch HD e-paper (Red, black, white),(880×528 pixels))
Hallo Julien,
wenn sich gar nichts tut, hast du evtl. den gleichen Fehler gemacht wie ich und kein Modul konfiguriert. Das kannst du daran erkennen, dass zwar das Display initialisiert wird, aber es am Ende weiß bleibt.
Auf der Inkycal Setup Seite, wo die settings.json erstellt wird, muss ein Modul hinzugefügt werden. Als Module werden die Wetter Infos und Kalender Daten bezeichnet.
Kann man auch ganz leicht daran erkenne, ob man seine Kalender URL angegeben hat 🙂
Gruß
Olaf
Not showing anything on 7.5 inch 3 color v2 480×800. script runs from Inkycal folder and shows messages like pyowm not installed plus others. but all installed already. When i run again run the install command it says already installed. Display blinks white and black for few seconds but after that no display (white). gives msg in terminal as next refresh after xx mins.
Did you configure modules (Weather or Calendar) to display with the “Add Module” button on the configuration page? That was my mistake during the first setup. You can also try to enable the checkbox for “Show time for last update”.
Attn: Olaf Brocke. added modules. But this is problem with the normal version. I tried the beta version image. Beta is working ok. But problems with icalendar. I dont have an iphone or mac system. Registered on icloud but calendar option not visible. My doubt is that if if I do not have any apple device can I get the calendar option? Thanks in advance.
Another new problem is the fading of E-ink display. Can I improve the display by modifying the driver file write timings?
You do not need any Apple device or account to use the calendar module. I use a Google calendar without problems. Search for public link to calendar to find the URL for configuration.
Additional infos can be found here: https://github.com/aceisace/Inkycal/wiki
Hi Eric Schuemann,
thank you for the awesome software.
Can you add the end time of a calendar entry as an option, please?
It’s better to plan the day if I have the end on the screen.
Keep up with the fantatsic work!
Hallo,
geiles Projekt, Danke erstmal!
Geht das auch mit einem öffentlichen Apple Kalender Link, bekomme da immer eine Fehlermeldung bei der Config.
Oder geht das Kalender-Modul nur mit Google Kalender?
Danke und Gruß
René
Hallo René,
Es funktioniert tatsächlich am besten mit einem Google Kalender oder einem Nextcloud Kalender. Der Apple Kalender bereitet hier leider Probleme.
Cool, ein Pfadi-Nerd.
Schönes Projekt!